Discover the Ultimate Solution for Durable Fibreglass Roofing
Transform Your Roof with OSB3 Tongue & Groove Boards
Explore the benefits of using OSB3 boards for your fibreglass roofing projects. Ensure a seamless and long-lasting finish with our expert guidance.
Step-by-Step Guide to Laying OSB3 Boards
1
Prepare the Roof Deck
Ensure the roof deck is clean and dry. Remove any debris or old materials to create a smooth surface for the OSB3 boards.
2
Lay the First Board
Start at one corner of the roof. Position the first OSB3 board with the groove side facing outwards and secure it with screws.
3
Continue Laying Boards
Align the tongue of the next board into the groove of the previous one. Ensure a snug fit and continue across the roof, securing each board as you go.
Understanding the Process
Step 1
How to Lay Boards
OSB3 Tongue & Groove ( Oriented Strand Board ) is the roof deck of choice for laying a new fibreglass roof. Its rough-textured surface allows the resin to get a firm grip and key into the board, meaning there is very little chance of delamination (the matting peeling away from the surface of the wood). Standard square edge boards allow 3mm gaps between adjoining boards for expansion.
Step 2
Preparing the deck
If the substrate is unfit for overboard onto directly then the surface will need to be removed. When laying decking, it is important to remember that the decking board will absorb moisture if in contact with water. Any moisture trapped within the roof will cause board movement and possibly a joint failure. As with laying the laminate, ensure that conditions are dry before decking the roof. After removing the old decking, check that all roofing joists are sound and free from rot. replace these as required. If possible, build a fall into the substrate so that the roof can drain completely and remain free from standing water.
Step 3
Laying the deck
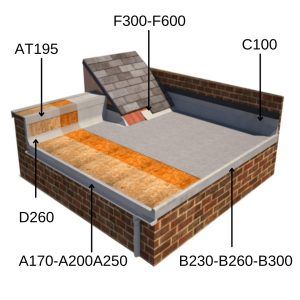
2400 X 600 X 18mm OSB3 tongue and groove boards are laid at 90° to the roof joists. The boards must be laid with the writing side uppermost. Not only does this give a better key for the laminate, but it also allows the resin to flow into the board joint to effectively glue the boards together.
Start to lay the boards at the furthest edge from the drip. If the board is laid along a wall, an expansion gap of 25mm should be left. Align the end of the board with the fascia, laying the boards from end to end. Trim the last board in the row flush with the fascia. Using the off-cut (if greater than 400mm,) start to lay the next row of boards by fitting the tongue firmly into the groove of the row already laid. The boards are now staggered and bonded and will form a strong deck.
When two rows have been laid, the boards can be aligned to run straight, fixing them as you go. Continue to lay each row, in turn, using the off-cut from one row to start the next row. The last row is simply cut off in line with the fascia.
Common Questions About Fibreglass Roofing
Explore answers to frequently asked questions about fibreglass roofing and OSB3 boards to ensure your project is a success.
What is the best board for fibreglass roofing?
OSB3 Tongue & Groove boards are ideal for fibreglass roofing due to their textured surface, which ensures excellent resin adhesion.
How do I prepare the roof deck for fibreglass application?
Ensure the OSB3 boards are clean, dry, and securely fixed with 3mm gaps between square edges for expansion.
Can fibreglass be applied in cold weather?
Fibreglass can be applied in temperatures above 5°C. Colder conditions may affect curing times and resin application.
How long does a fibreglass roof last?
A well-installed fibreglass roof can last over 25 years with minimal maintenance, making it a cost-effective solution.
What maintenance does a fibreglass roof require?
Regular cleaning and inspection for damage or wear will help maintain the roof’s integrity and prolong its lifespan.
Can I walk on a fibreglass roof?
Yes, fibreglass roofs are designed to be durable and can support foot traffic, but it’s advisable to avoid unnecessary weight.
Laying Boards in 60 seconds

Expansion is Critical

Learn how to install OSB TIMBER
Experience the durability and reliability of our GRP Roofing Kits, designed to provide a seamless and long-lasting finish for your flat roof projects. Don’t wait to transform your roof with our premium materials and expert guidance.
Adding edge trims to the perimetre is key for ensuring a professional fimish


